


Most Shopify sellers hit the same wall at some point. The store is doing decent volume, orders are flowing, payouts are hitting the bank, and the Xero file is quietly turning into a mess. Bank deposits don’t match the sales. Fees are lumped in the wrong place. GST on the BAS looks off. Reconciliation takes hours per month, and even then it doesn’t quite balance.
That’s when most sellers hear about A2X.
A2X sits between Shopify and Xero. It pulls each payout into a clean journal entry with sales, fees, refunds and GST split out correctly, and it gets your bank reconciliation matching to the cent. When it’s set up properly.
The setup is the important part. A rushed A2X connection can create just as many problems as it solves. This guide walks through the full A2X Shopify Xero setup for Australian sellers, including the settings that matter, the GST mapping, the chart of accounts prep, and the common mistakes worth avoiding.
What A2X actually does
Some quick context before the setup itself.
Every time Shopify pays out through Shopify Payments, that payout is a net figure. It includes the gross sales for the period, minus transaction fees, minus refunds, plus any adjustments like reserve releases. Record just the bank deposit as revenue and all the underlying detail is lost. Your books stop reflecting what actually happened in the store.
A2X connects to your Shopify Payments account, fetches each payout, and creates a summarised journal entry in Xero showing gross sales, fees, refunds, shipping revenue, GST collected, and every other line item posted to its own account. When the bank deposit lands a day or two later, it matches the A2X journal to the cent.
For sellers using Stripe, PayPal or other gateways alongside Shopify Payments, A2X handles each of those separately using the same principle.
Three things worth checking before you start
Setup goes smoother if a few things are in place first.
Your Xero plan needs to support the features A2X requires. In practice this means being on Standard or above. If you have USD or GBP payouts, you’ll likely need the Established plan for multi-currency support.
Your Xero chart of accounts should be tidy before A2X touches it. You want dedicated accounts for Shopify Sales, Shopify Shipping Income, Shopify Discounts, and separate expense accounts for Shopify Transaction Fees and Refunds. If you’re mid-year and the chart is a mess, this is the moment to clean it up rather than layer A2X on top. Our bookkeeping team in Sydney does this kind of cleanup regularly if the chart of accounts needs work first.
Your Shopify Payments and any other gateway accounts should be set up in Xero as clearing accounts, not bank accounts. A common mistake is treating a Stripe balance as a bank account. The A2X journal won’t reconcile properly against a bank feed on accounts that are set up incorrectly.
Step-by-step: connecting A2X to Shopify and Xero
Once the prep work is done, the A2X setup itself is straightforward. Here’s the full flow.

- Sign up for A2X and choose the Shopify plan that matches your store’s order volume. Higher volumes need higher tiers. Pick based on monthly Shopify orders, not revenue.
- Connect A2X to Shopify. A2X will ask you to authorise access to your store. This gives it read access to your orders, payouts and settlement data. Nothing in Shopify changes. A2X only reads.
- Connect A2X to Xero. Same idea, but with write access this time. A2X needs to be able to post journal entries into your Xero file. It only posts entries you approve, unless you enable auto-post later.
- Fetch your first settlement period. A2X pulls in the most recent Shopify payouts and displays them for review. Nothing has posted to Xero yet. This is the review stage.
- Set up your account mapping. This is the most important step. A2X shows you every category of transaction in your payouts. Product sales, shipping, discounts, refunds, transaction fees, gift cards, tips, and so on. For each one, you choose which Xero account it should post to and what tax code applies.
- Set up your GST/tax rate mapping. For Australian sellers, that means mapping taxable sales to a GST on Income tax rate, GST-free exports to a GST-Free Income rate, and Shopify Payments fees to a GST on Expenses rate (Shopify charges GST on its Australian fees).
- Preview and post the first journal. With mapping done, A2X shows you exactly what will post to Xero. Every account, every amount, every tax code. Check it once, post it, then reconcile the Shopify Payments deposit in Xero against the A2X journal.
- Enable auto-posting once you’re confident. Most sellers run manually for the first few weeks, then switch to auto-post once they trust the mapping.
Getting the chart of accounts right
Your A2X setup is only as clean as the Xero chart of accounts it posts to. A few account categories are worth having in place before you map:
- Shopify Product Sales (Revenue)
- Shopify Shipping Income (Revenue)
- Shopify Discounts (contra-revenue, applied as a reduction of sales)
- Shopify Gift Card Sales (Liability, not revenue — gift cards become revenue when redeemed)
- Shopify Transaction Fees (Cost of Sale or Expense)
- Shopify Refunds (contra-revenue, against the original sales category)
- Shopify Tips (either revenue or a payable account depending on how you handle tips)
- Rounding (a small clearing account for cent-level differences).
Separating these gives you a P&L that actually shows what’s happening in the store. Lumping everything into a single Sales account defeats the point of using A2X in the first place.
If you’re not sure what a proper chart of accounts should look like for your business, our ecommerce accounting services include setting this up from scratch or restructuring an existing one before A2X gets connected.
GST mapping for Australian Shopify sellers
The GST configuration in A2X needs to reflect how Shopify is handling GST at checkout.
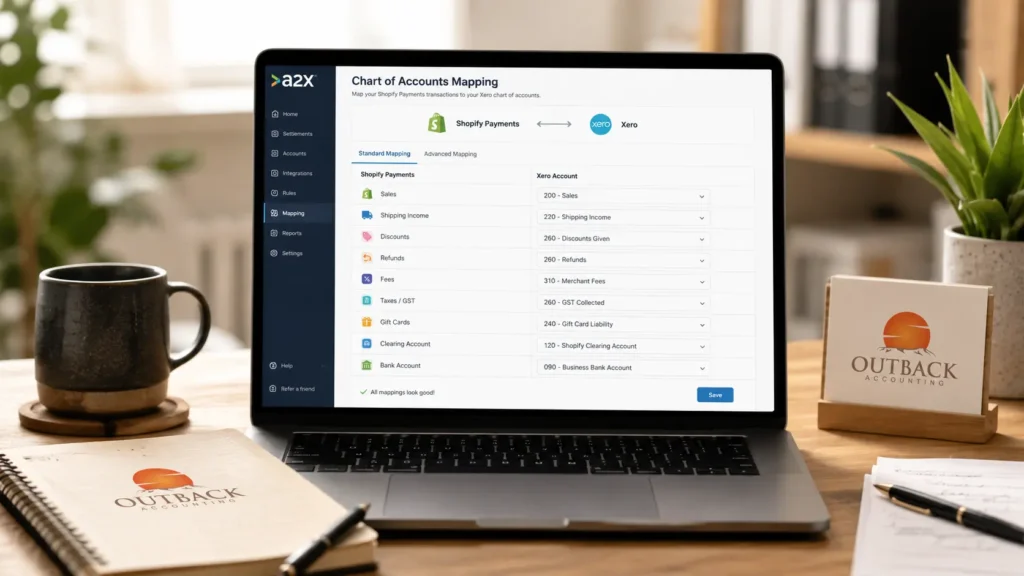
For most Australian Shopify sellers selling to Australian customers, sales include GST at 10% and Shopify collects it as part of the checkout. In A2X, those sales should map to a GST on Income tax rate in Xero so the GST portion is correctly reported.
Physical goods sold to overseas customers are generally GST-free exports. Map them separately in A2X to a GST-Free Income tax rate in Xero. This keeps your export sales visible on your BAS as GST-free supplies rather than being missed entirely.
Shopify’s own transaction fees to Australian merchants include GST. When A2X posts these to your Xero expense account, apply a GST on Expenses tax rate so you can claim the input tax credit on your BAS.
If your store sells digital products, the treatment can differ. Digital products to Australian consumers usually attract GST directly. Digital products to overseas consumers can be more complex. Worth confirming with your accountant if digital is a meaningful part of what you sell.
Your first reconciliation
Once A2X posts its first journal to Xero, the reconciliation is where you prove the setup is working.
Your Shopify Payments clearing account in Xero should show the A2X journal entry, with gross sales, fees, and refunds all sitting in their correct accounts. The corresponding Shopify Payments bank deposit will appear in your Xero bank feed a day or two later.
When you reconcile the bank deposit, Xero should suggest the A2X journal as the match. The two should agree to the cent. If they don’t, either the mapping is off or there’s a timing gap between what A2X pulled and what actually landed in the bank.
The first reconciliation always deserves close attention. Get it right in cycle one and subsequent months will follow. Get it wrong and catch it early, before three months of errors compound across every payout.
Common A2X setup mistakes to avoid
Mapping every sale category to a single Sales account. This removes the granularity that made A2X worth setting up in the first place.
Missing the GST rate on Shopify Payments fees. Australian sellers can claim input tax credits on the GST portion of Shopify’s fees. Coding them as GST-Free misses those credits every single quarter.
Setting up Shopify Payments as a bank account in Xero instead of a clearing account. The A2X journal won’t reconcile against a bank feed if Shopify Payments is treated as a bank rather than a clearing account.
Mixing gift card sales into revenue. Gift cards are a liability until they’re redeemed. Recording them as revenue when sold overstates income and creates GST reporting issues later.
Enabling auto-post too early. Take a few settlement periods to review manually first. It’s the fastest way to catch mapping errors before they turn into 20 unfixable journals.
Not accounting for refunds properly. Refunds should reduce the original sales category, not sit in a standalone refund account. Otherwise revenue is overstated and net-of-refunds figures are missing from your P&L.
Ignoring the Shopify Payments reserve balance. Shopify holds a small reserve on new accounts and releases it later. If you’re not tracking the clearing account balance, reserve movements can look like reconciliation errors when they aren’t.
Forgetting about Stripe or PayPal alongside Shopify Payments. If you accept payments through multiple gateways, each one needs its own A2X setup. Not just Shopify Payments.
When to bring in an ecommerce accountant
Setting up A2X properly is worth doing right the first time. For most sellers, the setup takes a few hours if you know what you’re doing. If you don’t, it can take a lot longer, and mistakes made during setup tend to compound quietly across every payout until someone eventually notices.
An ecommerce accountant is worth bringing in when:
- Your store is doing meaningful volume and mistakes will affect your BAS materially
- You use Shopify alongside other platforms like Amazon or eBay (we cover Amazon FBA accounting for Australian sellers separately if that applies to you)
- You’re on a multi-currency setup with USD or GBP payouts alongside AUD
- Your Xero file is already messy and needs a proper cleanup before A2X gets connected
- You’ve tried the setup and something isn’t reconciling and you can’t figure out what
Our team of A2X-certified ecommerce accountants works with Australian Shopify sellers on the full setup. That covers the initial A2X connection, chart of accounts prep, GST rate mapping, first reconciliation, and the switch to auto-post once everything is dialled in. As Xero Gold Partners, we handle the Xero side alongside A2X so both systems agree from day one.
Frequently asked questions
How much does A2X cost for Shopify? Pricing depends on your monthly Shopify order volume. Plans start at a lower tier for smaller stores and scale up as order volumes grow. A2X offers a free trial so you can see how it fits before committing. Check A2X directly for current pricing.
Do I need A2X if I’m on Xero already? Not if your Shopify volume is very low and manual reconciliation is genuinely working for you. Once you’re doing more than a handful of payouts per month, A2X saves significant time and produces more accurate books than manual reconciliation. For any Australian seller doing real volume, it’s the standard setup.
Can A2X handle multi-currency Shopify sales? Yes. A2X supports multi-currency for sellers receiving USD, GBP, EUR or other non-AUD currencies. Your Xero plan needs to support multi-currency (Established or equivalent), and each foreign currency clearing account needs to be set up correctly before A2X can map to it.
Does A2X work with Shopify Plus? Yes, across all Shopify plans including Plus. High-volume Plus stores generally need the higher A2X tiers, and setup can be more involved due to transaction volume and complexity.
How long does A2X setup take? For a straightforward store with a clean Xero file and AUD-only sales, setup usually takes 2 to 3 hours if you know what you’re doing. Multi-currency stores, or stores with an existing messy chart of accounts, take longer. An ecommerce accountant familiar with A2X can shorten the process significantly and avoid mistakes that would need fixing later.
What GST rate do I use in Xero for Shopify Payments fees? Shopify charges GST on its fees to Australian merchants. So map them in A2X to a GST on Expenses tax rate in Xero. That way the GST component becomes an input tax credit you can claim on your BAS.
Can A2X post journals automatically? Yes, once you’re confident in the mapping. Most sellers run A2X manually for the first few settlement periods to review each journal, then switch to auto-post once they trust the setup. Auto-post means every new payout is journaled to Xero without manual intervention.
Get your A2X setup right the first time
A2X is one of the best tools available for Shopify accounting in Australia. The value only shows up when the setup is right. Clean chart of accounts, correct GST mapping, gateway accounts treated properly, and a first reconciliation that ties to the cent.
If you’re setting up A2X for your Shopify store and want it done properly the first time, our A2X-certified ecommerce accountants work with Australian Shopify sellers on full A2X and Xero setup, GST configuration, and ongoing reconciliation. Get in touch with our Sydney team to talk about setting yours up.